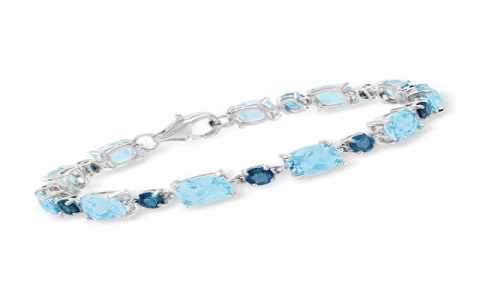
Okay, here’s my blog post about making a blue topaz gold vermeil tennis bracelet, written from my personal experience, step-by-step:
So, I’ve been wanting to try my hand at making a tennis bracelet for a while now. I saw this gorgeous blue topaz and gold vermeil one online and thought, “I can totally make that!” Here’s how the whole thing went down, from start to finish.
Gathering My Stuff
First things first, I needed to get all my materials together. This was probably the most time-consuming part, honestly. I had to make a list and scour different websites. I made sure to have:
- Blue Topaz Gemstones: I went with some small, round ones. The color is just so vibrant!
- Gold Vermeil Wire: Gotta have that gold look, but I didn’t want to break the bank, so vermeil it was. I picked a gauge that felt sturdy but not too thick.
- Gold Vermeil Clasp: This is the little thing that holds the bracelet together, so I made sure to get a good quality one.
- Jewelry Pliers: These are a MUST. I used a combination of round-nose, flat-nose, and chain-nose pliers.
- Wire Cutters: For snipping the wire, obviously.
- Beading Needle: Makes stringing the gemstones so much easier.
- Ruler or Measuring Tape: gotta measured.
Getting Started (The Fiddly Part)
Okay, so I started by cutting a length of wire, a bit longer than my wrist size. I figured extra is always better than not enough. Then, I used my round-nose pliers to create a small loop at one end of the wire.
After using the beading needle, carefully strung the blue topaz gemstones onto the wire. It took more time for me. And ensure they look so pretty and sparkly!
Creating the Links
This is where the real work began. Once all the gemstones were on, I used my flat-nose pliers to hold the wire just after the last gemstone. Then, with my round-nose pliers, I created another loop, just like the first one. And cut off the excess wire with my wire cutters.
And, I have to repeat. Repeated. Repeat again. I repeated this process, creating small links between each gemstone. It was tedious, to be honest, but also kinda meditative. I put on some music and just got into the zone.
Attaching the Clasp
Once I had my chain of linked gemstones, it was time to add the clasp. I used my flat-nose pliers to open the jump rings on the clasp (those little connecting rings). Then I attached one jump ring to the loop at one end of my gemstone chain, and the other jump ring to the loop at the other end. Make sure I closed the jump rings securely using pliers.
The Final Result!
And… that was it! I had a finished blue topaz gold vermeil tennis bracelet. It was a bit wonky in places, not gonna lie, but I was pretty proud of myself. I put it on and it looked beautiful.
It definitely wasn’t perfect, but I learned a lot during the process. I’d probably do a few things differently next time, like maybe using a slightly thicker wire for more stability. But overall, it was a fun and rewarding project!


